TL;DR:
Knowing how to install architectural shingles correctly is the key to achieving a 30-year lifespan and 130 mph wind resistance. This guide breaks down the professional layering process, from deck preparation to the final ridge cap, ensuring a leak-proof and visually stunning result for your Houston home.
Foundation First: Success depends on a clean deck, drip edges, and high-quality synthetic underlayment to prevent wood rot.
The Starter Course: Proper application of starter strips is non-negotiable for wind resistance and water shedding at the roof’s edge.
Staggered Pattern: Architectural shingles must be installed with a specific offset (usually 6 inches) to ensure seams never align and create leak points.
Nailing Zone: Precise nail placement along the manufacturer’s nail line is required to maintain your warranty and prevent shingles from blowing off.
Critical Seals: Professional-grade flashing around chimneys and valleys is just as vital as the shingles themselves for long-term protection.
When it comes to home improvement, few upgrades offer the immediate return on investment and aesthetic transformation like a high-quality roof. However, if you are researching how to install architectural shingles, you likely realize that this isn’t a simple “weekend warrior” project. Architectural shingles, also known as dimensional or laminate shingles, are significantly heavier and more complex than traditional 3-tab shingles.
At Achilles Roofing, we believe an educated homeowner is our best customer. As a GAF Certified contractor, we follow rigorous factory standards to ensure that every roof we touch in Houston, TX is built to withstand hurricane-force winds and blistering heat. Below is an exhaustive, professional-grade guide on the intricacies of a master-level installation.

The Architectural Advantage: Why the Install Matters
Unlike flat 3-tab shingles, architectural shingles are composed of two or more layers of asphalt that are laminated together. This creates a shadow line effect that mimics the look of wood shakes or slate. Because they are thicker, they have a higher wind rating, often up to 130 MPH, but only if the installation follows exact mechanical requirements.
If you are looking for the best team to install architectural shingles, you need a contractor who understands that the shingle is only as good as the system beneath it.
Phase 1: Preparation and Deck Recovery
The first secret of how to install architectural shingles correctly is what happens before the shingles even arrive at the job site. You cannot build a cathedral on a swamp, and you cannot install a 30-year roof on a rotting deck.
1. The Total Tear-Off
In Houston, some contractors might suggest a “lay-over” (installing new shingles over old ones). At Achilles Roofing, we strongly advise against this. Architectural shingles are heavy. Adding a second layer can stress your rafters. More importantly, a lay-off prevents you from seeing the condition of the wooden deck. We strip every roof down to the bare plywood to ensure the foundation is “Achilles Strong.”
2. Deck Inspection and Repair
Once the deck is clear, we inspect for delamination or rot. Houston’s high humidity often leads to soft spots around chimneys and valleys. Any compromised wood is replaced with high-grade CDX plywood or OSB to ensure a solid nail-pull resistance.
Phase 2: The “Dry-In” Process (Your Secondary Defense)
Before a single shingle is nailed down, the roof must be dried in. This is your backup layer of protection against the torrential rains common in the Gulf Coast.
1. Drip Edge Installation
The drip edge is a metal flashing installed along the eaves and rakes. It prevents water from curling under the shingles and rotting your fascia boards.
-
Pro Tip: At the eaves, the drip edge goes under the underlayment. At the rakes (the sides), it goes over the underlayment.
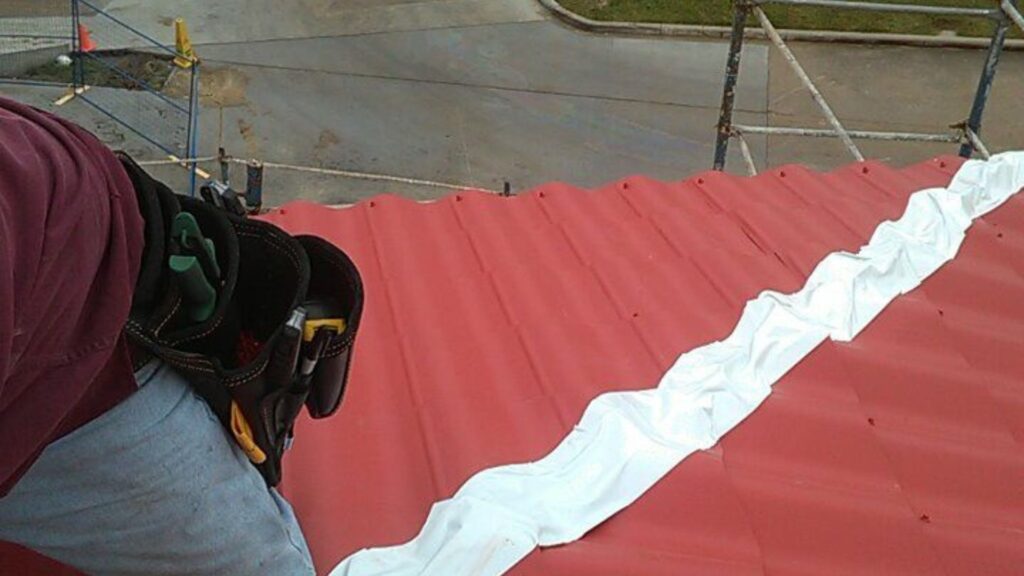
2. Leak Barrier (Ice and Water Shield)
In critical areas like valleys, dormers, and around skylights, a standard underlayment isn’t enough. We install a self-adhering leak barrier. This rubberized membrane seals around every nail that passes through it, creating a watertight gasket in the most vulnerable parts of your roof.
3. Synthetic Underlayment
We’ve evolved past old-fashioned felt paper. Achilles Roofing uses high-performance synthetic underlayment. It is non-absorbent, meaning it won’t wrinkle or telegraph through your beautiful new architectural shingles.
Phase 3: The Architecture of the Install
Now we reach the core of how to install architectural shingles. This requires precision geometry to ensure both aesthetics and waterproofing.
1. The Starter Strip
You never start the first row with a standard architectural shingle. If you do, the cutouts in the shingle will leave the wood deck exposed at the very edge of your roof. We use a dedicated starter strip that has a continuous bead of adhesive. This adhesive bonds to the underside of the first course of shingles, acting as the primary defense against wind uplift.
2. The Offset Pattern (The “Step” Method)
The key to how to install architectural shingles is the stagger. If your vertical seams are too close together, water will migrate sideways and find a path to the deck.
-
The 6-Inch Rule: We typically offset each course by at least 6 inches. This creates a diagonal pattern that ensures no two seams are stacked, providing maximum water shedding.
3. Mastering the StrikeZone
Architectural shingles are two layers welded together. You must nail through both layers (the common bond) to prevent the layers from separating. GAF Timberline HDZ® shingles feature a StrikeZone, a highly visible, reinforced nailing area.
-
The 6-Nail Power Pattern: While standard codes allow for 4 nails, Achilles Roofing utilizes a 6-nail pattern for every shingle. In a hurricane-prone city like Houston, those two extra nails provide the peace of mind you need when the wind starts to howl.
Phase 4: Flashing and Penetrations
A roof rarely leaks in the middle of a shingle; it leaks where the roof stops. Learning how to install architectural shingles means learning how to master metalwork.
1. Step Flashing
Everywhere the roof meets a wall (like a chimney or a second story), we install step flashing. These are individual L-shaped metal pieces woven into every shingle course. This ensures that water is constantly pushed back onto the surface of the shingles rather than behind the siding.
2. Counter Flashing
For brick chimneys, we reglet or counter-flash the metal into the mortar joints. This is a hallmark of a professional installation—using caulk alone is a temporary fix that will fail in the Texas sun.
Phase 5: Ventilation and The Ridge
The “Final Frontier” of how to install architectural shingles is the ventilation system. Without it, your shingles will cook from the inside out, leading to premature granule loss.
1. Ridge Vents
We install continuous ridge vents along the peaks of the roof. This allows hot, moist air to escape the attic naturally.
2. Ridge Cap Shingles
You cannot use regular shingles for the peak; they will crack when bent. We use specialized, pre-flexed ridge cap shingles that provide a high-profile, finished look to the home while sealing the ventilation system.
Why “DIY” Isn’t the Best Choice for Architectural Shingles
While the steps above provide a roadmap for how to install architectural shingles, the reality of Houston roofing is dangerous and technical.
-
Safety: Roofing is one of the most hazardous trades. Steep pitches and Houston’s heat index make it a job for professionals.
-
The GAF Warranty: GAF only provides its highest-tier “Golden Pledge” or “System Plus” warranties when the roof is installed by a certified contractor like Achilles Roofing. A DIY install usually limits your warranty to material only, leaving you responsible for labor costs if a defect occurs.
-
Proper Tools: Achieving the correct seal and the exact depth of a nail requires pneumatic tools calibrated specifically for the ambient temperature.

Trust the Achilles Standard
Learning how to install architectural shingles helps you understand the value of a professional crew. At Achilles Roofing, we don’t just lay shingles; we engineer a defense system for your home. From our meticulous clean-up (using high-powered magnets to find every stray nail) to our final 50-point inspection, we treat your home like our own.
Don’t leave your home’s protection to chance. Contact Achilles Roofing today for a free estimate. Whether you need a minor repair or a full architectural shingle upgrade, we are the Houston experts you can trust.